Thursday, May 9, 2013

Patio Party Scrapbook Pages

These are the pages we'll be making in my Scrapbook Class this month. They are very slightly tweaked from pages by Monika Davis. I liked how she used the Patio Party Designer Series Paper to create pages that would be appropriate for any special celebration, not just a birthday.


To make these pages, you'll need:

  • Card Stock/Paper: #124302 Whisper White 12x12, #111352 Baja Breeze, #126843 Midnight Muse, #126839 Summer Starfruit, #126841 Primrose Petals, #117152 Subtles Designer Series Paper Stack, and #126916 Patio Party Designer Series Paper
  • Ink: #126960 Baja Breeze
  • Accessories: #113439 Big Shot, #127553 Typeset Alphabet Dies, #119861 1-1/4" Circle Punch, #119854 1-3/4 Scallop Circle Punch, #122361 Petite Pennants Builder Punch, #127556 In Color Dahlias, #124262 White Baker's Twine

Monday, May 6, 2013

Beautiful Secret Garden Card

I love the bright, spring colors on this card. The flowers create an amazing focal point. They combine a couple of my favorite techniques...polished stone and embossing. To do the polished stone technique, wet a cotton ball with rubbing alcohol, and then drop one drop each of two or three shades of similar color ink refills (i.e. 3 different pinks) onto the cotton ball. Pounce the cotton ball onto Glossy White card stock. Continue pouncing until the white is completely covered. Once it is dry, stamp the flower onto the polished stone piece with VersaMark. Cover with gold emboss powder and heat to melt. Use the matching Secret Garden Framelits to cut out the flowers.


To make this card, you'll need:

  • Stamps: #129141 Secret Garden, #122650 Delightful Dozen, #109521 En Francais
  • Cardstock: #105118 So Saffron, #100730 Whisper White, #102599 Glossy White
  • Ink: #126957 So Saffron, #102283 VersaMark
  • Accessories: #129053 Heat Tool, #109129 Gold Emboss Powder, Ink Refills (#101962 More Mustard, #119672 Daffodil Delight, #105225 So Saffron, #111841 Tangerine Tango, #122934 Calypso Coral, #105229 Pumpkin Pie, #102295 Pretty in Pink, #111843 Pink Pirouette, #115662 Melon Mambo, #109020 Wild Wasabi, and #102059 Garden Green), #113439 Big Shot, #129372 Secret Garden Framelits dies, sewing machine with light tan thread, cotton balls, rubbing alcohol

Tuesday, April 30, 2013

"Just Believe" Straw-Blowing Card


This is one of the cards we did in my most recent class. I think everyone really enjoyed the "straw-blowing" technique on this card. It makes a gorgeous background for silhouette images like this one from the "Just Believe" stamp set. Watch the video below to learn how to do this fun technique.


To make this card, you'll need:
  • Stamps: #116948 Just Believe, #123025 Fabulous Florets, #125525 Apothecary Art
  • Cardstock: #100730 Whisper White, #122924 Pool Party, #122922 Wisteria Wonder, #102599 Glossy White
  • Ink: #126982 Pool Party, #101406 Black StazOn
  • Accessories: Ink Refills (#122933 Pool Party, #122931 Wisteria Wonder, #122932 Island Indigo), #122973 Wisteria Wonder Ruffled Ribbon, #104430 Dimensionals, drinking straw, dotto, paper towel

Thursday, April 25, 2013

Extra Tips for the Stamped Candle project

Hopefully you've had a chance to watch the video about making stamped candles from my last post. Here are just a few extra tips to ensure success with your stamped candle projects:

  • Tip #1: Make sure that your heat tool is HOT before you aim it toward your candle. Otherwise you'll melt the candle away while you wait for it to heat up. Once the heat tool is ready, it should only take a few seconds of heating for the tissue paper to disappear. 
  • Tip #2: Don't overheat your candle! Move the heat tool to a new area as soon as the tissue paper becomes invisible. Once the candle is overheated, the wax begins to melt and drip. You will no longer have a smooth candle surface.
  • Tip #3: Don't wave the heat tool quickly over the entire candle. You'll have more control and be able to see exactly what you're doing if you move it slowly. 
  • Tip #4: It's better to under-heat than overheat! If you peel away the wax paper and notice that there is still some tissue paper showing, just wrap the wax paper around the candle again and heat the candle with the heat tool until the tissue paper disappears. 
  • Tip #5: If you want to add several different images to the candle, or if you want the images to go all the way around, just do a section at a time. Don't try to do it all in one step.
Have fun experimenting with different designs for your stamped candles. Just think of all the different reasons to make candles...Christmas decorations, Fall decorations, Mother's Day gifts, Birthdays gifts, Teacher gifts, Housewarming gifts...the list could go on and on!

Wednesday, April 24, 2013

Stamped Candle


One of my favorite projects to make has always been "stamped" candles. They make quick, easy, inexpensive gifts! Check out the video below to learn how to make your own stamped candle.


To make this project, you'll need:
  • Stamps: #122900 Kindness Matters

  • Paper: #126910 2012-2014 In Color Designer Series Paper Stack

  • Accessories: Markers (#126856 Primrose Petals, Midnight Muse, Summer Starfruit, #100082 Basic Black), #129053 Heat tool, #126844 2012-2014 Primrose Petals Stitched Satin Ribbon, #118402 Scallop Trim Border Punch

  • Non-SU: Candle, wax paper, tissue paper, see-through gift bag

Saturday, April 20, 2013

Word Play Graduation Card

My daughter will be graduating from high school in just one month! I want to have a really special card to give to her and extras for her to give to some of her friends who are graduating with her. While looking around for graduation card ideas, I came across a beautiful card by Melissa Davies. I changed the colors to match my daughter's school colors, and made a couple of other very minor tweaks. Here's the finished product!


To make this card you'll need:
  • Stamps: #120308 Word Play
  • Cardstock: #100730 Whisper White, #119685 Cherry Cobbler, #100867 Night of Navy, and #124005 Silver Glimmer Paper
  • Ink: #102283 VersaMark
  • Accessories: #122949 Cherry Cobbler Emboss Powder, #129053 Heat Tool, #126189 Paper-Piercing Tool, #126187 Essentials Paper-Piercing Pack, #113439 Big Shot, #125601 Adorning Accents Folders, #125595 Adorning Accents Edgelits, #122125 3" Circle die, #120992 Cherry Cobbler Seam Binding Ribbon, #104430 Stampin' Dimensionals, Stars #2 die (retired), and Swirls Scribbles Sizzlet die (retired)


Thursday, April 18, 2013

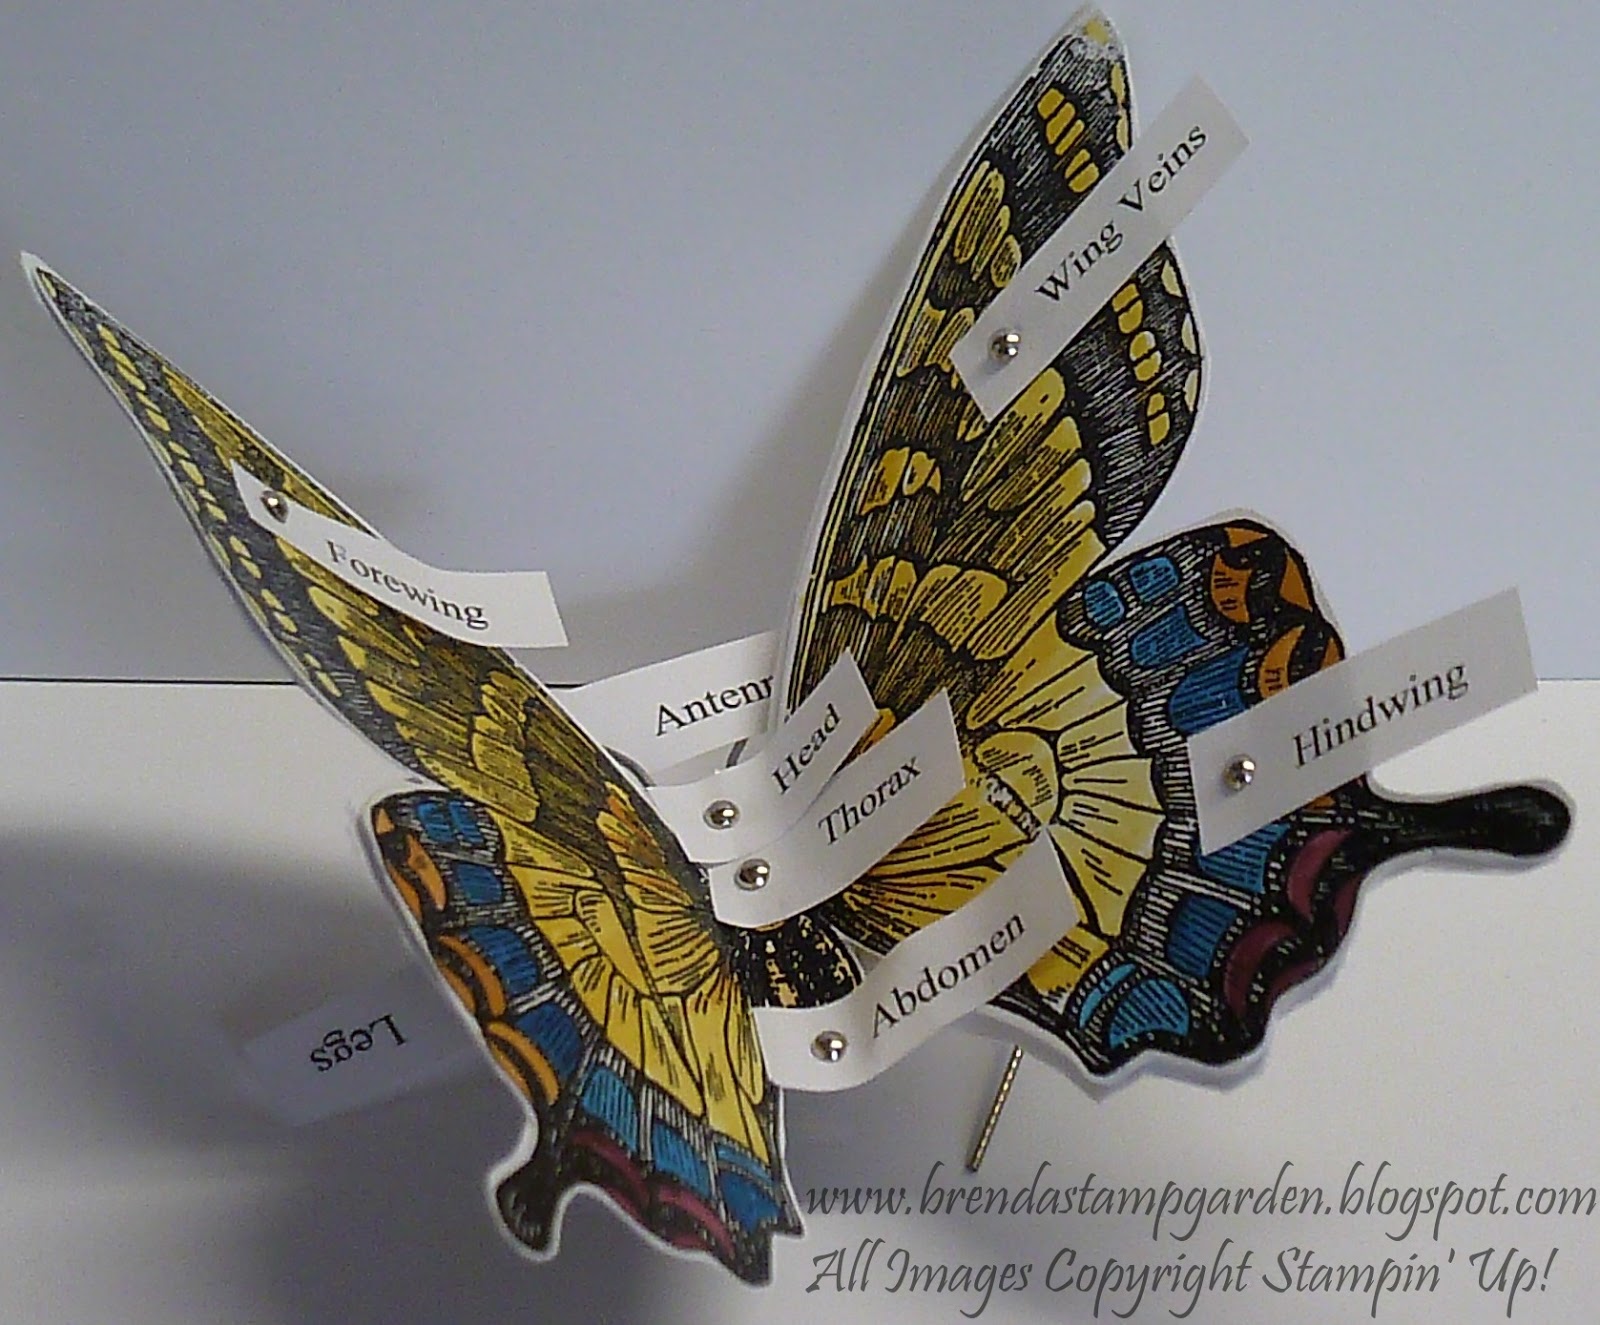
Swallowtail Butterfly Biology Project

You know you've been stamping for awhile when your children choose their school project topics based on the stamps they know you have at home! My son had to choose any insect, make a model with labeled body parts, and create a poster full of information about that insect. He knew I had the beautiful Stampin' Up! Swallowtail Butterfly stamp, so that was the insect he chose. We embossed two butterflies with black emboss powder and colored them with ink refills. Then he cut them out, created legs using cut up paper clips, and then layered the two butterflies together (so the underside of the wings are the same as the top side). He cut out his little labels and attached them with mini silver brads. Check it out!


Products used:

  • Stamps: #129213 Swallowtail
  • Cardstock: #100730 White
  • Ink: #102283 VersaMark Pad
  • Accessories: #109133 Black Emboss Powder, #129053 Heat Tool, Ink Refills (#119672 Daffodil Delight, #101962 More Mustard, #126950 Rich Razzleberry, #111840 Pacific Point), #122941 Mini Silver Brads, #126189 Paper-Piercing Tool, paper clips, and a paintbrush