Thursday, May 9, 2013

Patio Party Scrapbook Pages

These are the pages we'll be making in my Scrapbook Class this month. They are very slightly tweaked from pages by Monika Davis. I liked how she used the Patio Party Designer Series Paper to create pages that would be appropriate for any special celebration, not just a birthday.


To make these pages, you'll need:

  • Card Stock/Paper: #124302 Whisper White 12x12, #111352 Baja Breeze, #126843 Midnight Muse, #126839 Summer Starfruit, #126841 Primrose Petals, #117152 Subtles Designer Series Paper Stack, and #126916 Patio Party Designer Series Paper
  • Ink: #126960 Baja Breeze
  • Accessories: #113439 Big Shot, #127553 Typeset Alphabet Dies, #119861 1-1/4" Circle Punch, #119854 1-3/4 Scallop Circle Punch, #122361 Petite Pennants Builder Punch, #127556 In Color Dahlias, #124262 White Baker's Twine

Monday, May 6, 2013

Beautiful Secret Garden Card

I love the bright, spring colors on this card. The flowers create an amazing focal point. They combine a couple of my favorite techniques...polished stone and embossing. To do the polished stone technique, wet a cotton ball with rubbing alcohol, and then drop one drop each of two or three shades of similar color ink refills (i.e. 3 different pinks) onto the cotton ball. Pounce the cotton ball onto Glossy White card stock. Continue pouncing until the white is completely covered. Once it is dry, stamp the flower onto the polished stone piece with VersaMark. Cover with gold emboss powder and heat to melt. Use the matching Secret Garden Framelits to cut out the flowers.


To make this card, you'll need:

  • Stamps: #129141 Secret Garden, #122650 Delightful Dozen, #109521 En Francais
  • Cardstock: #105118 So Saffron, #100730 Whisper White, #102599 Glossy White
  • Ink: #126957 So Saffron, #102283 VersaMark
  • Accessories: #129053 Heat Tool, #109129 Gold Emboss Powder, Ink Refills (#101962 More Mustard, #119672 Daffodil Delight, #105225 So Saffron, #111841 Tangerine Tango, #122934 Calypso Coral, #105229 Pumpkin Pie, #102295 Pretty in Pink, #111843 Pink Pirouette, #115662 Melon Mambo, #109020 Wild Wasabi, and #102059 Garden Green), #113439 Big Shot, #129372 Secret Garden Framelits dies, sewing machine with light tan thread, cotton balls, rubbing alcohol

Tuesday, April 30, 2013

"Just Believe" Straw-Blowing Card


This is one of the cards we did in my most recent class. I think everyone really enjoyed the "straw-blowing" technique on this card. It makes a gorgeous background for silhouette images like this one from the "Just Believe" stamp set. Watch the video below to learn how to do this fun technique.


To make this card, you'll need:
  • Stamps: #116948 Just Believe, #123025 Fabulous Florets, #125525 Apothecary Art
  • Cardstock: #100730 Whisper White, #122924 Pool Party, #122922 Wisteria Wonder, #102599 Glossy White
  • Ink: #126982 Pool Party, #101406 Black StazOn
  • Accessories: Ink Refills (#122933 Pool Party, #122931 Wisteria Wonder, #122932 Island Indigo), #122973 Wisteria Wonder Ruffled Ribbon, #104430 Dimensionals, drinking straw, dotto, paper towel

Thursday, April 25, 2013

Extra Tips for the Stamped Candle project

Hopefully you've had a chance to watch the video about making stamped candles from my last post. Here are just a few extra tips to ensure success with your stamped candle projects:

  • Tip #1: Make sure that your heat tool is HOT before you aim it toward your candle. Otherwise you'll melt the candle away while you wait for it to heat up. Once the heat tool is ready, it should only take a few seconds of heating for the tissue paper to disappear. 
  • Tip #2: Don't overheat your candle! Move the heat tool to a new area as soon as the tissue paper becomes invisible. Once the candle is overheated, the wax begins to melt and drip. You will no longer have a smooth candle surface.
  • Tip #3: Don't wave the heat tool quickly over the entire candle. You'll have more control and be able to see exactly what you're doing if you move it slowly. 
  • Tip #4: It's better to under-heat than overheat! If you peel away the wax paper and notice that there is still some tissue paper showing, just wrap the wax paper around the candle again and heat the candle with the heat tool until the tissue paper disappears. 
  • Tip #5: If you want to add several different images to the candle, or if you want the images to go all the way around, just do a section at a time. Don't try to do it all in one step.
Have fun experimenting with different designs for your stamped candles. Just think of all the different reasons to make candles...Christmas decorations, Fall decorations, Mother's Day gifts, Birthdays gifts, Teacher gifts, Housewarming gifts...the list could go on and on!

Wednesday, April 24, 2013

Stamped Candle


One of my favorite projects to make has always been "stamped" candles. They make quick, easy, inexpensive gifts! Check out the video below to learn how to make your own stamped candle.


To make this project, you'll need:
  • Stamps: #122900 Kindness Matters

  • Paper: #126910 2012-2014 In Color Designer Series Paper Stack

  • Accessories: Markers (#126856 Primrose Petals, Midnight Muse, Summer Starfruit, #100082 Basic Black), #129053 Heat tool, #126844 2012-2014 Primrose Petals Stitched Satin Ribbon, #118402 Scallop Trim Border Punch

  • Non-SU: Candle, wax paper, tissue paper, see-through gift bag

Saturday, April 20, 2013

Word Play Graduation Card

My daughter will be graduating from high school in just one month! I want to have a really special card to give to her and extras for her to give to some of her friends who are graduating with her. While looking around for graduation card ideas, I came across a beautiful card by Melissa Davies. I changed the colors to match my daughter's school colors, and made a couple of other very minor tweaks. Here's the finished product!


To make this card you'll need:
  • Stamps: #120308 Word Play
  • Cardstock: #100730 Whisper White, #119685 Cherry Cobbler, #100867 Night of Navy, and #124005 Silver Glimmer Paper
  • Ink: #102283 VersaMark
  • Accessories: #122949 Cherry Cobbler Emboss Powder, #129053 Heat Tool, #126189 Paper-Piercing Tool, #126187 Essentials Paper-Piercing Pack, #113439 Big Shot, #125601 Adorning Accents Folders, #125595 Adorning Accents Edgelits, #122125 3" Circle die, #120992 Cherry Cobbler Seam Binding Ribbon, #104430 Stampin' Dimensionals, Stars #2 die (retired), and Swirls Scribbles Sizzlet die (retired)


Thursday, April 18, 2013

Swallowtail Butterfly Biology Project

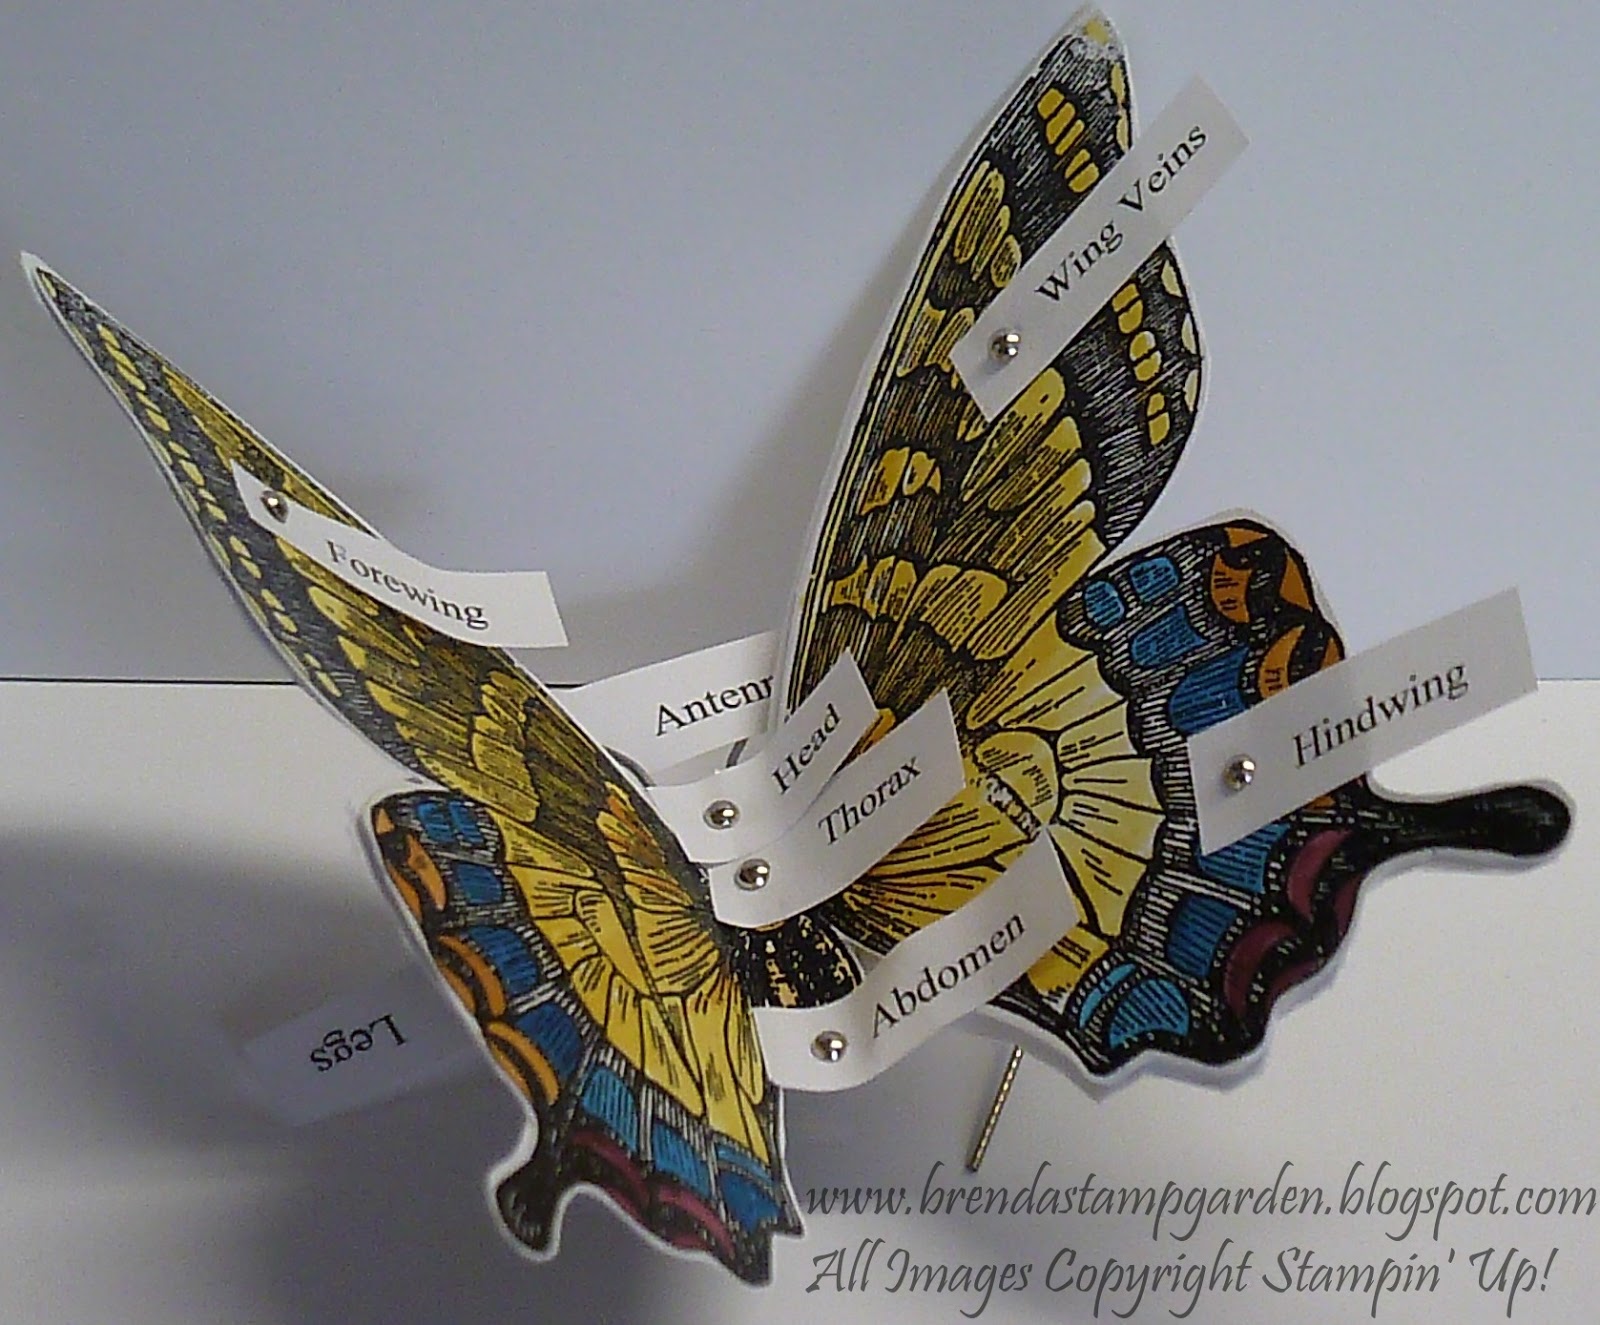
You know you've been stamping for awhile when your children choose their school project topics based on the stamps they know you have at home! My son had to choose any insect, make a model with labeled body parts, and create a poster full of information about that insect. He knew I had the beautiful Stampin' Up! Swallowtail Butterfly stamp, so that was the insect he chose. We embossed two butterflies with black emboss powder and colored them with ink refills. Then he cut them out, created legs using cut up paper clips, and then layered the two butterflies together (so the underside of the wings are the same as the top side). He cut out his little labels and attached them with mini silver brads. Check it out!


Products used:

  • Stamps: #129213 Swallowtail
  • Cardstock: #100730 White
  • Ink: #102283 VersaMark Pad
  • Accessories: #109133 Black Emboss Powder, #129053 Heat Tool, Ink Refills (#119672 Daffodil Delight, #101962 More Mustard, #126950 Rich Razzleberry, #111840 Pacific Point), #122941 Mini Silver Brads, #126189 Paper-Piercing Tool, paper clips, and a paintbrush

Sunday, April 14, 2013

Secret Garden Bouquet Card

Last week I had the honor and privilege of attending a class by my downline Jan B. It was really fun to be a student again. Check out this gorgeous card we made! I can't wait to give it to my mom for Mother's Day! My husband asked me to make another one just like it for his mom.


To make this card, you'll need:

  • Stamps: #129141 Secret Garden, and Messages for Mom (retired)
  • Cardstock/Paper: #126841 Primrose Petals, #115318 Soft Suede, #101650 Very Vanilla, Blushing Bride (will be available 5/31/13), and #122384 2011-2013 In Color Designer Series Paper Stack
  • Ink: #126858 Primrose Petals, #126978 Soft Suede, and #102283 VersaMark
  • Accessories: #113439 Big Shot, #129372 Secret Garden Framelits, #121810 Petal Cone die, #109132 White Emboss Powder, #129053 Heat Tool, #101610 Stampin' Sponges, and #104430 Stampin' Dimensionals

Wednesday, April 10, 2013

Floral District Card

This is the card you will receive as a gift from me if you place a $25 order through me during the month of April. This card was created by Cindy M. I love the simplicity! The colors are absolutely gorgeous.


To make this card,.you'll need:
  • Stamps: #122585 My Friend and #126004 Betsy's Blossoms
  • Cardstock/Paper: #115316 Rich Razzleberry, #100730 Whisper White, and #126919 Floral District Designer Series Paper
  • Ink: #101406 Jet Black StazOn and #126950 Rich Razzleberry
  • Accessories: #119854 1-3/4" Scallop Circle Punch, #119861 1-1/4" Circle Punch, #119868 1" Circle Punch, #118309 Itty Bitty Shapes Punch Pack, #119246 Basic Rhinestone Jewels, and #104430 Stampin' Dimensionals

Friday, April 5, 2013

Free Shipping April 6-8, 2013!!


3 DAYS ONLY!!! April 6-8, Stampin' Up! is offering FREE SHIPPING on EVERYTHING!!
(excluding expedited orders)
This is a fantastic opportunity to stock up on all your favorites!
Don't miss out!!! Order Here!!


Stampin' Up! Color Refresh

Announcing our Color Refresh! We love color and we know that you do too. Color is fundamental to who we are and what we offer. It's important for us to stay up-to-date with color trends so we are thrilled to share our updated line of colors, and hope you will be as excited as we are by the new possibilities!

Brights
Rich Razzleberry, Pacific Point, Tempting Turquoise, Bermuda Bay, Old Olive, 
Daffodil Delight, Pumpkin Pie, Tangerine Tango, Real Red, Melon Mambo

Subtles
Wisteria Wonder, Marina Mist, Soft Sky, Pool Party, Wild Wasabi,
Pear Pizzazz, So Saffron, Calypso Coral, Blushing Bride, Pink Pirouette

Regals
Perfect Plum, Elegant Eggplant, Night of Navy, Island Indigo, Garden Green,
Always Artichoke, Crushed Curry, Cajun Craze, Cherry Cobbler, Rose Red

In the Neutrals Collection, there will be a beautiful new light gray called Smoky Slate, and River Rock will be discontinued. But otherwise, the Neutrals will remain the same.

Beginning on April 4, 2013, all retiring/discontinued color products (i.e. ink, paper, ribbon, accessories, etc.) will be available only while supplies last. So be sure to stock up on your favorites! Stampin' Up! also announced they will be offering FREE SHIPPING on EVERYTHING April 6-8, 2013! Click here to order!


Wednesday, April 3, 2013

Blooming with Kindness card


Today I want to show you a quick, easy card. This card uses an emboss resist technique on glossy card stock. The result is just beautiful. To achieve this look, stamp the flowers onto glossy white card stock using VersaMark ink. Cover with Gold Emboss Powder, shake off excess, and heat to melt. Once the embossing is cooled, use sponges to rub colored ink onto the card stock. The ink will not stick to the embossed images. After the card stock is completely covered, wipe over the whole thing with a paper towel to remove any extra ink. I love how the flowers just POP! Try this technique with different embossing powders, ink colors, and images. It's amazing how striking such a simple layout can be!

To make this card, you'll need:
  • Stamps: #126420 Blooming with Kindness
  • Cardstock: #126841 Primrose Petals, #126843 Midnight Muse, #102599 Glossy White
  • Ink: #102283 VersaMark, #126858 Primrose Petals, #126860 Midnight Muse
  • Accessories: #109129 Gold Emboss Powder, #129053 Heat Tool, #101610 Stamping Sponges, #126844 Primrose Petals Stitched Satin Ribbon, #118402 Scallop Trim Border Punch

Saturday, March 30, 2013

Secret Garden Scrapbook Pages

This is the scrapbook layout we'll be making for my April Scrapbook Class. It features the Secret Garden stamp set from Stampin' Up! The technique I used on these pages is exactly the same technique I used on the Easter Blessings card a few weeks ago. Check out the video about the card to learn more about this gorgeous technique.


To make these pages, you'll need:

  • Stamps: #129141 Secret Garden, #124162 Everything Eleanor, #128939 Itty Bitties
  • Cardstock/Paper: #124274 Crumb Cake 12x12, #126842 Raspberry Ripple, #100730 Whisper White, #126836 2012-2014 In Color 12x12, #126910 2012-2014 In Color Designer Series Paper Stack
  • Ink: #126859 Raspberry Ripple, #126973 Garden Green, #101731 Whisper White Craft
  • Accessories: #113439 Big Shot, ##120893 Tasteful Trim die, #109132 White Emboss Powder, #129053 Heat Tool, #102892 Sponge Daubers, #102845 Blender Pens, #126856 2012-2014 In Color Markers, #119702 Brights Markers, #122332 Crumb Cake Seam Binding Ribbon, #119243 Paper Daisies, #118309 Itty Bitty Shapes Punch Pack, #129329 Designer Builder Brads, #129399 Paper Doilies

Thursday, March 28, 2013

Adorable Scallop Envelope Purse


Here's a fun, spring project for you! It's an adorable little purse or Easter basket made using the Scallop Envelope die from Stampin' Up! It has a ribbon handle and a beautiful flower accent. You can learn how to make this project by watching the video below. Have fun, and Happy Spring!!


To make this purse, you'll need:

  • Stamps: #128939 Itty Bitties
  • Cardstock/Paper: #122923 Island Indigo, #122924 Pool Party, #100730 Whisper White, Sycamore Street Designer Series Paper*
  • Ink: #126946 Tangerine Tango OR #126950 Rich Razzleberry
  • Accessories: #113439 Big Shot, #113462 Scallop Envelope die, #125603 Blossom Punch, #129329 Designer Builder Brads, #118309 Itty Bitty Shapes Punch Pack, #101227 1/16" Handheld Punch, #102300 Bone Folder, #122941 Mini Brads, #104294 Sticky Strip, Sycamore Street Ribbon*
*The Sycamore Street Designer Series Paper and Sycamore Street Ribbon are no longer available, but Stampin' Up! has lots of other beautiful Designer Series Papers and Ribbons to choose from.

Saturday, March 23, 2013

Spice Cake Fabric Dress Up Card

I just love the new Dress Up Framelits! This is a card that I received as a swap from my friend Stefani C. I liked it so much that I decided to use it in my Stamp Classes this month. It uses the Spice Cake Designer Fabric for the dress...so pretty!


To make this card, you'll need: 
  • Stamps: #109521 En Francais and #129651 Bloomin' Marvelous
  • Cardstock: #122924 Pool Party, #100946 More Mustard, #119686 Early Espresso, and #101650 Very Vanilla
  • Ink: #126974 Early Espresso and #126982 Pool Party
  • Accessories: #113439 Big Shot, #129381 Ovals Framelits, #130101 Dress Up Framelits, #124066 Spice Cake Designer Series Fabric, #130812 Sycamore Street Ribbon & Button Pack, #129387 Occasions Paper-Piercing Pack, #126189 Paper-Piercing Tool, #118309 Itty Bitty Shapes Punch Pack, #119247 Basic Pearls, #123124 Early Espresso Baker's Twine, #126869 Flower Trim, #104430 Stampin' Dimensionals, #103683 Glue Dots


Thursday, March 21, 2013

Shaving Cream Easter Egg Card


The bright, fun Easter Eggs on this card are made with the same shaving cream technique that we used for our March scrapbook pages. Watch the video below to learn how to do this great technique!


To make this card, you'll need:

  • Stamps: #122650 Delightful Dozen
  • Cardstock: #115320 Melon Mambo, #126840 Gumball Green, and #100730 Whisper White
  • Ink: #126948 Melon Mambo
  • Accessories: Ink Refills (#115662 Melon Mambo, #119672 Daffodil Delight, and #101041 Tempting Turquoise), #114319 White Organza Ribbon, #119882 Scallop Edge Border Punch, #119859 Extra-Large Oval Punch
  • PLUS: Shaving cream, craft stick, paper plate, and rubber gloves

Saturday, March 16, 2013

Happy St. Patrick's Day!

I created this St. Patrick's Day card by modifying one of the cards included in Stampin' Up!'s new Basics Online Class. I wanted to make a fun, different St. Patrick's Day card, so I changed the colors and the stamp set, but the layout is exactly the same. This card uses the Lucky Day stamp and the masking technique. The Basics Online Class comes with several videos and PDF files with supply lists, instructions, and pictures for over 30 projects. Order the class though my Online Store! Enter item # 133385. It is only $14.95 (free shipping and handling!)


To make this card you'll need:

  • Stamps: #129177 Lucky Day
  • Cardstock/Paper: #100730 Whisper White, #102935 Brushed Gold, #127885 Champagne Glimmer Paper
  • Ink: #126959 Wild Wasabi, #126973 Garden Green, #102283 VersaMark Pad
  • Accessories: #102395 Brayer, #113439 Big Shot, #125598 Labels Framelits, #127857 Festive Paper-Piercing Pack, #126189 Paper Piercing Tool, #101930 Iridescent Ice Emboss Powder, #109129 Gold Emboss Powder, #129053 Heat Tool

Wednesday, March 13, 2013

Easter Blessings Card

I just love how soft and pretty this card is! I think this is my new favorite technique. The technique may have other names, but I'm calling it the modified black magic technique. The black magic technique uses White Craft ink and chalks, but instead of chalks this version uses markers.


Watch the video below to learn how to do this great technique!


To make this card, you'll need:
  • Stamps: #129141 Secret Garden and #129183 Easter Blessings
  • Cardstock: #124302 Whisper White 12x12, #120953 Crumb Cake, #111351 Pink Pirouette
  • Ink: #126973 Garden Green, #126981 Basic Gray, #101731 Whisper White Craft Pad
  • Accessories: #109132 White Emboss Powder, #129053 Heat Tool, #102892 Sponge Daubers, #126856 2012-2014 In Color Stampin' Write Markers, #119702 Brights Stampin' Write Markers,  #102845 Blender Pens, #129399 Tea Lace Paper Doilies, #113439 Big Shot, #129381 Ovals Framelits, #129294 1-1/4" Two-Tone Ribbon Pink Pirouette/Rose Red, #103683 Glue Dots


Saturday, March 9, 2013

More Amore Dress Up Card

This is the card I will give you as a FREE GIFT if you place an order of at least $25 through me (either in person or online) during the month of March. This card features the More Amore Designer Series Paper and the Dress Up Framelits from Stampin' Up!


To make this card you'll need:

  • Stamps: #126420 Blooming with Kindness
  • Cardstock/Paper: #122924 Pool Party, #121044 Basic Gray, #126841 Primrose Petals, #101650 Very Vanilla, and #129309 More Amore Specialty Designer Series Paper
  • Ink: #126981 Basic Gray
  • Accessories: #113439 Big Shot, #130101 Dress Up Framelits, #119854 1-3/4" Scallop Circle Punch, #119860 1-3/8" Circle Punch, #126187 Essentials Paper-Piercing Pack, #126189 Paper-Piercing Tool, #130812 Sycamore Street Ribbon, and #104430 Stampin' Dimensionals

Wednesday, March 6, 2013

Watercolored Swallowtail Card


I absolutely LOVE this Swallowtail butterfly stamp from Stampin' Up! This was my swap card for Leadership. It was also one of the cards we made in my February Stamp Class. Watch the video below to see how it's made.


To make this card, you'll need:
  • Stamps: #129213 Swallowtail and #129633 Vintage Verses
  • Cardstock: #111350 Pacific Point and #101910 Shimmery White
  • Ink: #102283 VersaMark Pad
  • Accessories: #109133 Black Emboss Powder, #101930 Iridescent Ice Emboss Powder, #129053 Heat Tool, Ink Refills (#119672 Daffodil Delight, #101962 More Mustard, #126950 Rich Razzleberry, #111840 Pacific Point), and a paintbrush


Saturday, March 2, 2013

Feel Goods Banner Card

I just love this chalkboard card inspired by my upline, Jen Jacobsen! The color combination is so fresh and bright. It's a fun card featuring Stampin' Up!'s Feel Goods stamp set and Sycamore Street Designer Series Paper.


To make this card, you'll need:
  • Stamps: #129681 Feel Goods
  • Cardstock/Paper: #115316 Rich Razzleberry, #122924 Pool Party, #121045 Basic Black, and #127540 Sycamore Street Designer Series Paper*
  • Ink: #101731 Whisper White Craft ink
  • Accessories: #113439 Big Shot, #121809 Framed Tulips Embossing Folder, #130159 Hearts a Flutter Framelits, #102892 Sponge Daubers, #125574 Pool Party Baker's Twine, #130812 Sycamore Street Ribbon & Button Pack*, #104430 Stampin' Dimensionals, and #103683 Glue Dots
* Exclusive Sale-a-Bration products! You can get these items for FREE through March 22! For every $50 you order (before shipping and tax) you can choose one free item.
     

Thursday, February 28, 2013

NEW Online Class! from Stampin' Up!

Be among the first to experience the new Online Class!
Learn innovative ways to get the most out of your supplies (from stamps to the Big Shot) with clever tips and all the techniques you need to start creating with success.

Divided into six sections focused on a variety of topics, this class includes videos, step outs, and supply lists for 30+ projects. Join the fun!


Order through my Online Store! The Basics Online Class, Item #133385, $14.95 (FREE shipping and handling!)

Saturday, February 23, 2013

Soda Pop Top Monogram Necklace


Create gorgeous gifts for your family and friends! Watch the video below to learn how to make this beautiful monogram necklace using Stampin' Up!'s new Soda Pop Tops! Amy Storrie showed us how to make these during one of the Share Fair classes at Leadership, and I couldn't wait to come home and make a whole bunch of them!


To make this necklace, you'll need:
  • Cardstock/Paper: Very Vanilla cardstock and First Edition Specialty Paper
  • Accessories: Big Shot, Soda Pop Tops, 1/16” Handheld Punch, 1” Circle Punch, ¾” Circle Punch, Rhinestones, Crystal Effects, Broadsheet Alphabet Digital Stamp Set, and My Digital Studio Software
  • Other Supplies: 6mm Jump Rings and Black Suede Necklace Cord
 

Tuesday, February 19, 2013

"Oh, Hello" Thank You Card

Anyone who places an order of $25 or more through me during the month of February (either in person or online) will receive this card featuring the Stampin' Up! set, "Oh, Hello" as a gift from me!

 
To make this card, you'll need:
  • Stamps: Oh, Hello and Collage Curios
  • Cardstock/Paper: So Saffron, Midnight Muse, Rich Razzleberry, Whisper White, and 2012-2014 In Color Designer Series Paper Stack (Midnight Muse pattern)
  • Ink: Basic Black and Daffodil Delight
  • Accessories: Big Shot, Fun Flowers die, Soda Pop Tops, 1/2" Circle Punch, Crystal Effects, and Glue Dots
  • Other: paper towels, non-porous container, and bleach
To do the bleach stamping technique, place at least 8 layers of paper towels in a shallow, non-porous container. Soak the paper towels with bleach. Use the soaked paper towels as an ink pad. When you stamp onto the cardstock it will only appear wet, but wait a few seconds and the magic will begin! Each cardstock color will bleach a little differently, so have fun experimenting with this fun technique.
 
To make the center of the flower, place a small Soda Pop Top between two standard cutting pads and then place on the Big Shot platform with all the tabs flipped out. Run through the Big Shot. Stamp an image onto a Whisper White scrap and then punch out with the 1/2" Circle Punch. Adhere the stamped image to the flattened Soda Pop Top. Fill with Crystal Effects. Allow it to dry for a couple of hours and then attach to the flower with a glue dot.


Sunday, February 17, 2013

Swallowtail and Shaving Cream Scrapbook Pages

When I attended my very first Stampin' Up! workshop about 8 years ago, the demonstrator (my future upline) told me that if I dreamed about stamping, I was hooked. Well, guess what? I dreamed about stamping that night, and many more nights to come! I still occasionally have "stampin' dreams". In my latest dream, I made scrapbook pages that combined the beautiful Swallowtail Butterfly stamp and the Shaving Cream technique. Once I woke up, I could hardly wait to start creating! The result will be the pages we'll make in my March Scrapbooking Class. Here they are:


To make these pages you'll need:
  • Stamps: Swallowtail and Vintage Verses (Sale-a-Bration)
  • Cardstock: Daffodil Delight, Melon Mambo, Whisper White, Tangerine Tango, and Gumball Green
  • Ink: VersaMark and Whisper White Craft
  • Accessories: Melon Mambo Embossing Powder, White Embossing Powder, Heat Tool, Ink Refills (Melon Mambo, Daffodil Delight, and Tangerine Tango), Big Shot, Tasteful Trim die, Apothecary Accents Framelits, Pearls, Large Pearls, Gumball Green 3/8" Stitched Satin Ribbon, Bitty Butterfly Punch, Elegant Butterfly Punch, and Glue Dots
To do the Shaving Cream technique: Spray out a large pile of shaving cream (yep, regular, cheap shaving cream) onto a cookie sheet or other large tray. Drop different ink colors randomly all over the shaving cream. Gently swirl the ink into the shaving cream with a craft stick (don't mix it completely; you still want to see distinct colors). Lay the Whisper White cardstock onto the shaving cream and press lightly (you might want to wear rubber gloves for this part!). Lift up the cardstock and wipe off the shaving cream with paper towels. It's a messy job, but the results are totally worth it!

Wednesday, February 13, 2013

Artisan Embellishments Card and Album set

One of my favorite on-stage presentations from the Leadership Convention was Sara Douglass' Artisan Embellishments ensemble. She showed how to make several cards and 3-D projects using the Artisan Embellishments kit plus just a few additional items. The first thing I did when I got home was to recreate some of her projects and tweak a few to make them my own. This set uses every single element from the kit including the chipboard that it's packaged in. Here are the projects...


To make this set, you'll need:

 
#120953 Crumb Cake Cardstock              $6.95
#107297 Crumb Cake Envelopes              $6.50
#126856 2012-2014 In-Color Markers    $14.95
#129328 Artisan Embellishments Kit        $9.95
#104199 Linen Thread                               $4.50
#126854 Midnight Muse Ink Refill            $2.95
#103683 Glue Dots                                     $4.95
Total                                                          $50.75
#129633 Vintage Verses Stamp Set (W)  FREE!
(Item #129636 (C))
The Vintage Verses stamp set is only available through March 22! You can get yours FREE with an order of $50 or more.
 
Other items you'll need to complete the set: needle or paper piercer, paintbrush, adhesive, strong hole punch, scissors, paper cutter.

Monday, February 11, 2013

More Amore Scrapbook Pages


I just love these beautiful scrapbook pages by Sandy Mathis! To make these pages, you'll need:
  • Stamps: Hearts a Flutter
  • Cardstock/Paper: Very Vanilla (12x12), Real Red, Pool Party, Basic Grey, and More Amore Designer Series Paper
  • Ink: Pook Party, Real Red, and Basic Grey
  • Accessories: Big Shot, Typeset Alphabet dies, Timeless Type Alphabet Sizzlets (retired), Hearts a Flutter Framelits, Small Heart Punch, Sycamore Street Ribbon and Button pack (Sale-a-Bration), Pool Party Baker's Twine, Stampin' Dimensionals, Basic Pearls, Glue Dots

Saturday, February 9, 2013

Petal Cone Take-Out Box

 
Watch the video below to learn how to make this super-cute Take-Out box!
 
 
Supplies used:
Stamps: Hearts a Flutter and Bloomin' Marvelous
Cardstock/Paper: Rich Razzleberry (12"x 12"), Whisper White, and Floral District Designer Series Paper
Ink: Baja Breeze, Rich Razzleberry, Basic Black
Accessories: Big Shot, Petal Cone die, Stampin' Trimmer, Hearts a Flutter Framelits, Bitty Butterfly Punch, Natural 7/16" Trim Ribbon, Linen Thread, 1/16" Handheld Punch, Sticky Strip


Tuesday, February 5, 2013

Feel Goods and Sycamore Street DSP

I just love going to our monthly demonstrator meetings. I always leave inspired, and with lots of fresh ideas! This card was my swap for our meeting. To make this card, you'll need:
  • Stamps: Feel Goods
  • Cardstock/Paper: Whisper White, Pool Party, Island Indigo, Tangerine Tango, Sycamore Street Designer Series Paper
  • Ink: Island Indigo
  • Accessories: Big Shot, Ovals Framelits dies, Square Lattice Embossing Folder, Sycamore Street Ribbon, Boho Blossoms punch, Designer Printed Brads, Paper Piercer, Glue Dot
You can get the Sycamore Street Designer Series Paper or the Sycamore Street Ribbon and Button Pack for FREE with a $50 order during Sale-a-Bration. Click on the image below to view the entire Sale-a-Bration brochure.

Saturday, January 26, 2013

Delicate Doilies

 
The second card from my January stamp classes was inspired by a design by Erica Cerwin. To create this card, you will need:
  • Stamps: Delicate Doilies, Perfectly Penned
  • Cardstock/Paper: Whisper White, Crumb Cake, Neutrals Designer Series Paper Stack (Crumb Cake)
  • Ink: Basic Black, VersaMark Pad
  • Accessories: White Embossing Powder, Heat Tool, White Organza Ribbon, Rhinestone Jewels, Big Shot, Tasteful Trim die


Hearts a Flutter


This triple layer Valentine's Day card is one of the cards from my most recent stamp class. I created this card by request of Pauly H. Thanks, Pauly! This card could be easily modified to fit just about any occasion. To create this card you will need:
  • Stamps: Hearts a Flutter, Seasonal Sayings
  • Cardstock: Rose Red, Whisper White
  • Ink: Rose Red, Pink Pirouette, Pool Party
  • Accessories: Pink Pirouette/Rose Red 1-1/4" Two-Tone Ribbon, Glue Dots, Stampin' Spritzer, Frost White Shimmer Paint.
  • Other: 70% isopropyl rubbing alcohol, repositionable adhesive
The picture doesn't show well the beautiful shimmer all over the card. To create the shimmer, pour a few drops of shimmer paint into an empty Stampin' Spritzer and then fill with in an inch of the top with rubbing alcohol. Shake well and then spritz all over the card.

Wednesday, January 23, 2013

Paper Pumpkin

Sweep away the mundane-your creativity carriage awaits!
I'm Paper Pumpkin . . .
I come to your door each month (a fully decked-out creativity carriage). I'll help you to escape your life with some paper fun.
I come in a sweet box, but you'll really love what you find on the inside:
All the stamps, ink, paper, and accessories to create pinable projects. Create stuff like cards, journals, décor, and more!
Paper Pumpkin by Stampin' Up! is a new monthly kit program that anyone can enjoy!
Get Started
It's so easy to get started. Simply sign up for the program by visiting www.mypaperpumpkin.com and click Get it. Every month a new, surprise project kit arrives at your doorstep. Just think of the anticipation of creating a fun project to pin, showoff, and share with your friends and family-every month!
Of course, you'll want to know more. So here's the nitty gritty:
  • Each month you'll receive a unique, surprise kit with a project-cards, journals, décor, and more! (We've even color-coordinated, measured, and cut everything for you!)
  • Each kit includes stamps, ink, paper, and accessories-everything but adhesive.
  • Each kit gives you and your customer a 30-minute creativity escape.
  • We will ship your Paper Pumpkin on or around the 15th of the month.
  • You need to sign up for a kit by the 10th of the month to get that month's kit. If you sign up on the 11th of the month, your first kit will come the next month. (Let's say you sign up on May 10th, we'll send your kit around May 15th. If you sign up on May 11th, we'll send your first kit around June 15th.)
  • A Paper Pumpkin membership is $19.95 per month (and shipping is included!)  
  • There's no commitment, you can cancel your monthly Paper Pumpkin at anytime. You can also skip a month if you want.
  • Starting in early March, we'll offer a Try-It kit if you'd like to try Paper Pumpkin for one month.

Dude, You're Welcome! Kit


Guys don't always have the easiest time expressing themselves, but with the Dude, You're Welcome! kit, they'll have
  • Four wood-mount stamps (double-mounted) with the perfect sentiment for every occasion
  • Twelve 4" x 6" postcards in four different (manly) colors
  • Twelve gray envelopes
  • A Basic Gray Classic Stampin' Pad
  • An instructional guide (for the most novice stamper!)
Basically, the kit includes everything a dude needs to create the perfect manly card that any woman would adore, all packaged in an appropriately masculine box.
Item
Description
Price
132807
Dude, You're Welcome! Kit
$24.95

Welcome!

I'm so excited to be joining the blog world! I plan to use this blog to post Stampin' Up! news and promotions, and to share projects that I'm doing in my classes. I may also occasionally share special news about my family. I'm a hockey mom, so I'm sure you'll see a picture or two of my boys playing hockey:-).
Blogging is brand new to me, so please be patient as I try to figure things out.
In the meantime, please visit my online store anytime for amazing Stampin' Up! products.